目的:在不越狱的前提下,使用动态库库注入的方式来hook应用的某些函数以篡改应用行为。
需要的工具:
砸壳: dumpdecrypted
class-dump: class-dump
Cycript: cycript
IDA: ida demo
theos: theos
iosopendev: iosopendev
调试: lldb+debugserver
本文以微信自动抢红包为例,虽然教程很多了,但还是从如何获取关键调用函数的过程来分析。
以下内容仅供研究学习,请不要用于非法用途,笔者概不负责。
进入正题:
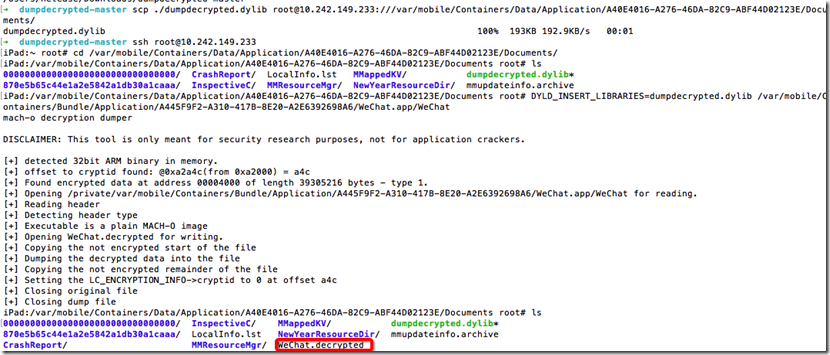
1.砸壳:
参考文章:http://www.alonemonkey.com/dumpdecrypted-app.html
获取Document目录:
[[NSFileManager defaultManager] URLsForDirectory:NSDocumentDirectory inDomains:NSUserDomainMask][0]
如果不想自己砸壳,可以直接从PP助手上下载一个即可,已经砸过壳的。
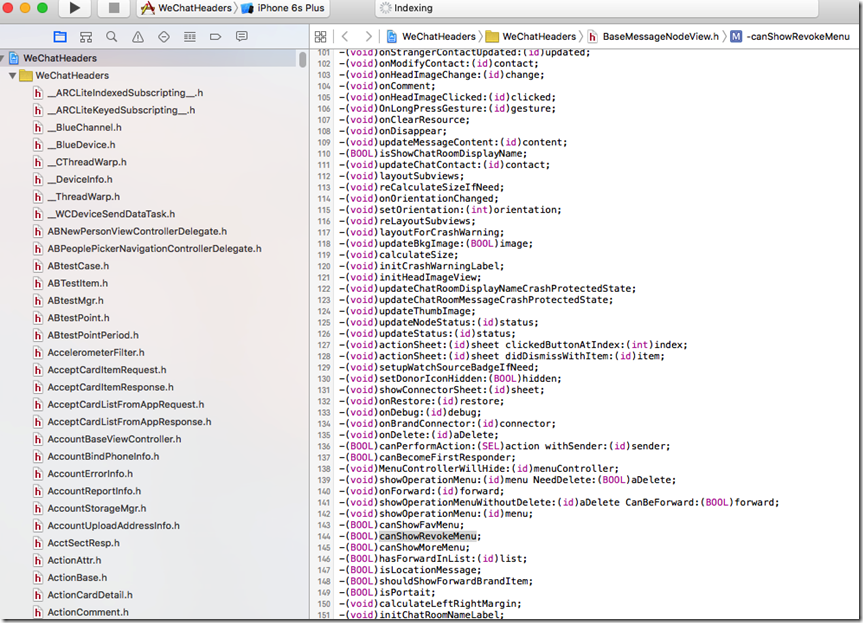
2.class-dump:
参考文章:http://www.alonemonkey.com/ioss-class-dump-z.html
使用:class-dump-z WeChat.decrypted -H -o OutPutHeaders
拿到头文件后,新建一个Xcode工程,然后把头文件拖进去备用查找。
3.开始分析工作:
先要找到从别人发来的消息是哪个函数在处理。
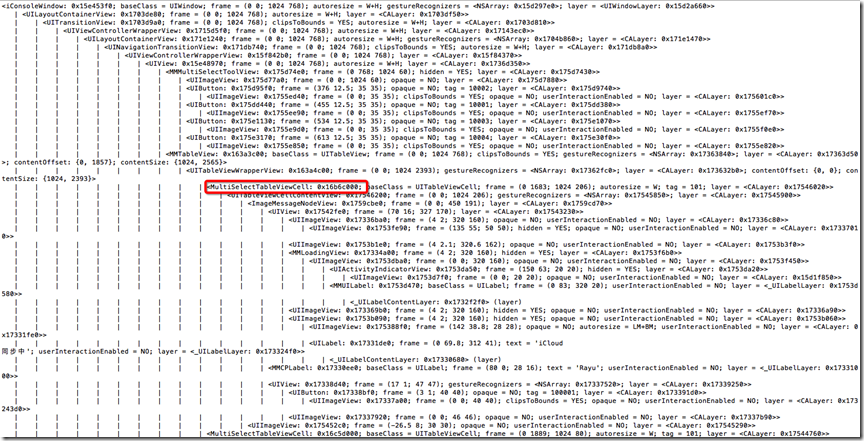
首先还是从界面入手,随便进入一个群聊天界面,使用Cycript显示出界面结构:
随便找一个其中的控件,然后找到它的controller。
找到了一个叫BaseMsgContentViewController的ViewController,使用theos Logify的方法来跟踪这个类。
参考博文:http://www.alonemonkey.com/ioss-theos-logify.html
打开群聊界面,往该群组发送消息,从log输出可以看到添加消息节点的调用:
– [<BaseMsgContentViewController: 0x1638b200> addMessageNode:{m_uiMesLocalID=76, m_ui64MesSvrID=2873926057328047596, m_nsFromUsr=1759668824@chatroom, m_nsToUsr=wxi*l12~19, m_uiStatus=4, type=1, msgSource=”<msgsource>
<silence>0</silence>
<membercount>3</membercount>
</msgsource>
“} layout:1 addMoreMsg:0]
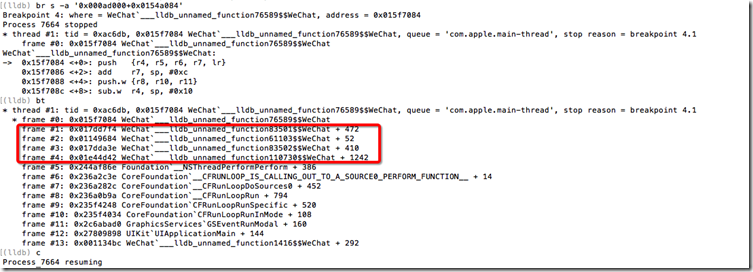
为了获取这个消息包的来源,下面要使用lldb进行调试,查看堆栈调用。
附加微信进程,使用 image list -o -f 获取微信模块加载的基地址,这里基地址为: 0xad000
-[BaseMsgContentViewController addMessageNode:layout:addMoreMsg:]:的文件偏移地址为:0x0154a084
下断点:
br s -a ‘0xad000+0x0154a084’
计算0x017dd7f4在文件中的地址:
0x017dd7f4 – 0xad000 = 0x17307F4
而这个地址在:
-[BaseMsgContentLogicController DidAddMsg:]
继续 回溯:
0x01149684 – 0xad000 = 0x109C684
这个地址在:
-[RoomContentLogicController DidAddMsg:]
0x017dda3e – 0xad000 = 0x1730A3E
这个地址在:
-[BaseMsgContentLogicController OnAddMsg:MsgWrap:]:
0x01e44d42 – 0xad000 = 0x1D97D42
这个地址在:
-[CMessageMgr MainThreadNotifyToExt:]:
到此,整个流程基本就出来了:
-[CMessageMgr MainThreadNotifyToExt:]:
–>
-[BaseMsgContentLogicController OnAddMsg:MsgWrap:]:
——>
-[RoomContentLogicController DidAddMsg:]
———->
-[BaseMsgContentLogicController DidAddMsg:]
—————->
-[BaseMsgContentViewController addMessageNode:layout:addMoreMsg:]:
跟踪类CMessageMgr,继续发送消息测试。
通过log可以获取到大致的流程如下:
-[CMessageMgr MessageReturn:MessageInfo:Event:]
–>
-[CMessageMgr AsyncOnAddMsg:MsgWrap:]
——>
-[CMessageMgr MainThreadNotifyToExt:]
这就是为什么很多文章都说要在-[CMessageMgr AsyncOnAddMsg:MsgWrap:]这个函数拦截消息的原因了。
接着发个红包看看消息包的内容:
mesType:49
sender:175***68824@chatroom
to:wxid_wtrsjdfy64il12
content:xia***g28:
<msg><appmsg appid=”” sdkver=””><des><![CDATA[我给你发了一个红包,赶紧去拆!]]></des><url><![CDATA[https://wxapp.tenpay.com/mmpayhb/wxhb_personalreceive?showwxpaytitle=1&msgtype=1&channelid=1&sendid=10000373012016032560109227249&ver=6&sign=3c0406fab3e5e2a2ed90be8e3da61374f54487b1c693ac55e8204cf045d78c36f8b2047dc28e667d2b9f451b319346f7565c756549d5843d2f44f89243fbf8539e09da7690ec31bbbf5c7c9cde86b3286bf0870e998fca308668b1d5fbf20f8c]]></url><type><![CDATA[2001]]></type><title><![CDATA[微信红包]]></title><thumburl><![CDATA[http://wx.gtimg.com/hongbao/img/hb.png]]></thumburl><wcpayinfo><templateid><![CDATA[7a2a165d31da7fce6dd77e05c300028a]]></templateid><url><![CDATA[https://wxapp.tenpay.com/mmpayhb/wxhb_personalreceive?showwxpaytitle=1&msgtype=1&channelid=1&sendid=10000373012016032560109227249&ver=6&sign=3c0406fab3e5e2a2ed90be8e3da61374f54487b1c693ac55e8204cf045d78c36f8b2047dc28e667d2b9f451b319346f7565c756549d5843d2f44f89243fbf8539e09da7690ec31bbbf5c7c9cde86b3286bf0870e998fca308668b1d5fbf20f8c]]></url><iconurl><![CDATA[http://wx.gtimg.com/hongbao/img/hb.png]]></iconurl><receivertitle><![CDATA[恭喜发财,大吉大利!]]></receivertitle><sendertitle><![CDATA[恭喜发财,大吉大利!]]></sendertitle><scenetext><![CDATA[微信红包]]></scenetext><senderdes><![CDATA[查看红包]]></senderdes><receiverdes><![CDATA[领取红包]]></receiverdes><nativeurl><![CDATA[wxpay://c2cbizmessagehandler/hongbao/receivehongbao?msgtype=1&channelid=1&sendid=10000373012016032560109227249&sendusername=xia***g28&ver=6&sign=3c0406fab3e5e2a2ed90be8e3da61374f54487b1c693ac55e8204cf045d78c36f8b2047dc28e667d2b9f451b319346f7565c756549d5843d2f44f89243fbf8539e09da7690ec31bbbf5c7c9cde86b3286bf0870e998fca308668b1d5fbf20f8c]]></nativeurl><sceneid><![CDATA[1002]]></sceneid><innertype><![CDATA[0]]></innertype><scenetext>微信红包</scenetext></wcpayinfo></appmsg><fromusername><![CDATA[xia***g28]]></fromusername></msg>
mesSource:<msgsource>
<silence>0</silence>
<membercount>3</membercount>
</msgsource>
4.接着分析工作:
上面已经得到了接受消息的处理函数,然后怎么自动去打开这个红包呢?
还是从领取红包的界面入手:
hookWCRedEnvelopesReceiveHomeView这个类,可以从log看到打开红包的时候调用-[WCRedEnvelopesReceiveHomeView OnOpenRedEnvelopes]这个函数:
– [<WCRedEnvelopesReceiveHomeView: 0x1656f120; frame = (0 0; 1024 768); clipsToBounds = YES; autoresize = W+H; layer = <CALayer: 0x14da5c40>> OnOpenRedEnvelopes]
IDA分析:
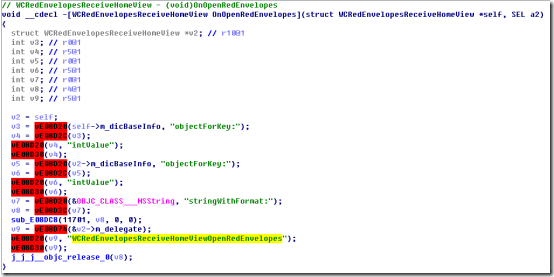
在IDA里面搜索函数:WCRedEnvelopesReceiveHomeViewOpenRedEnvelopes
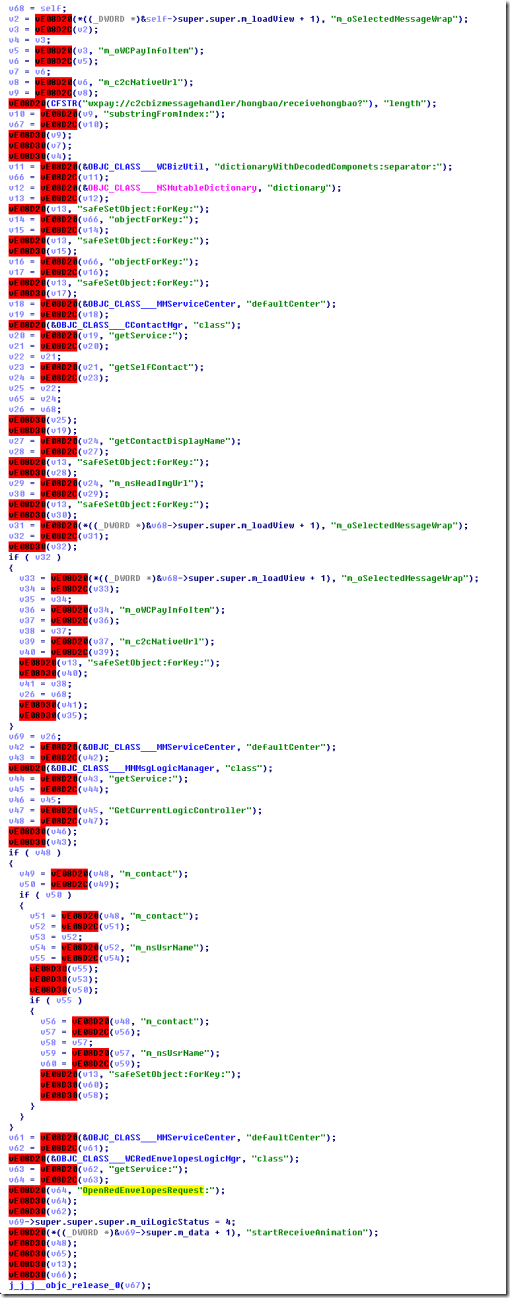
发现只有WCRedEnvelopesReceiveControlLogic这个类里面有这个函数,用IDA跟进该函数:
基本流程如下:
获取红包的消息包,得到消息包的m_oWCPayInfoItem属性,然后拿出m_c2cNativeUrl除了wxpay://c2cbizmessagehandler/hongbao/receivehongbao?的其它部分。
wxpay://c2cbizmessagehandler/hongbao/receivehongbao?msgtype=1&channelid=1&sendid=10000373012016032560109227249&sendusername=xia***g28&ver=6&sign=3c0406fab3e5e2a2ed90be8e3da61374f54487b1c693ac55e8204cf045d78c36f8b2047dc28e667d2b9f451b319346f7565c756549d5843d2f44f89243fbf8539e09da7690ec31bbbf5c7c9cde86b3286bf0870e998fca308668b1d5fbf20f8c
msgtype=1&channelid=1&sendid=10000373012016032560109227249&sendusername=xia***g28&ver=6&sign=3c0406fab3e5e2a2ed90be8e3da61374f54487b1c693ac55e8204cf045d78c36f8b2047dc28e667d2b9f451b319346f7565c756549d5843d2f44f89243fbf8539e09da7690ec31bbbf5c7c9cde86b3286bf0870e998fca308668b1d5fbf20f8c
按&拆分
{
channelid = 1;
msgtype = 1;
sendid = 10000373012016032560109227249;
sendusername = xia***g28;
sign = 3c0406fab3e5e2a2ed90be8e3da61374f54487b1c693ac55e8204cf045d78c36f8b2047dc28e667d2b9f451b319346f7565c756549d5843d2f44f89243fbf8539e09da7690ec31bbbf5c7c9cde86b3286bf0870e998fca308668b1d5fbf20f8c;
ver = 6;
}
生成字典:
{
channelId = 1;
msgType = 1;
sendId = 10000373012016032560109227249;
}
拿到个人资料:
[[[MMServiceCenter defaultCenter] getService:[CContactMgr class]] getSelfContact]
拿到昵称和头像:
getContactDisplayName
m_nsHeadImgUrl
加到字典:
{
channelId = 1;
headImg = “http://wx.qlogo.cn/mmhead/ver_1/c6Dx0qq06keVnF3LTicYUaZYVT572gsyzNzbUc7lMPanMdTAsmhhbZPHCLhM1AbAAPhibbEzCC1QEaVwguTgtqEsbichAcaNwaYDmVvmcj7eyE/132”;
msgType = 1;
nickName = “\U963f\U55b5”;
sendId = 10000373012016032560109227249;
}
获取nativeurl和当前群id加入字典:
[[[MMServiceCenter defaultCenter] getService:[MMMsgLogicManager class]] GetCurrentLogicController]
最后调用请求接口:
[[[MMServiceCenter defaultCenter] getService:[WCRedEnvelopesLogicMgr class]] OpenRedEnvelopesRequest:dic]
所以可以通过拦截消息包,然后构造请求参数,最后调用接口打开红包。
5.动手写Tweak:
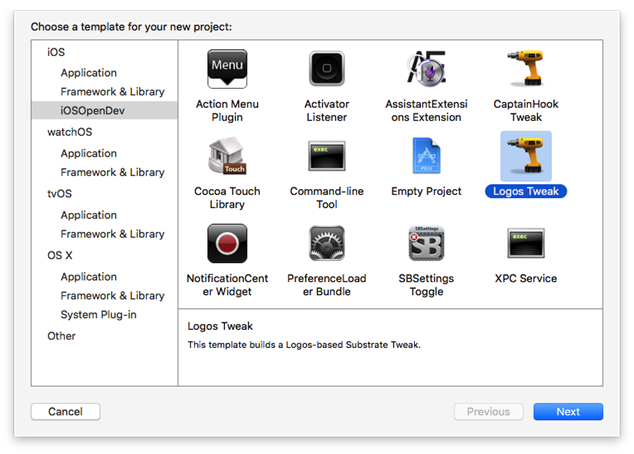
先在越狱机器上进行越狱开发,后面再说怎么迁移到非越狱机器上去,新建一个Logos Tweak工程。
编写代码如下:
1 2 3 4 5 6 7 8 9 10 11 12 13 14 15 16 17 18 19 20 21 22 23 24 25 26 27 28 29 30 31 | %hook CMessageMgr -(void)AsyncOnAddMsg:(id)message MsgWrap:(CMessageWrap* )msgWrap { %log; if(msgWrap.m_uiMessageType == 49){ CContactMgr *contactManager = [[%c(MMServiceCenter) defaultCenter] getService:[%c(CContactMgr) class]]; CBaseContact *selfContact = [contactManager getSelfContact]; if ([msgWrap.m_nsContent rangeOfString:@"wxpay://c2cbizmessagehandler/hongbao/receivehongbao"].location != NSNotFound) { // 红包 NSString *nativeUrl = [[msgWrap m_oWCPayInfoItem] m_c2cNativeUrl]; nativeUrl = [nativeUrl substringFromIndex:[@"wxpay://c2cbizmessagehandler/hongbao/receivehongbao?" length]]; NSDictionary *nativeUrlDict = [%c(WCBizUtil) dictionaryWithDecodedComponets:nativeUrl separator:@"&"]; NSMutableDictionary *args = [[%c(NSMutableDictionary) alloc] init]; [args addObject:nativeUrlDict[@"msgtype"] forKey:@"msgType"]; [args addObject:nativeUrlDict[@"sendid"] forKey:@"sendId"]; [args addObject:nativeUrlDict[@"channelid"] forKey:@"channelId"]; [args addObject:[selfContact getContactDisplayName] forKey:@"nickName"]; [args addObject:[selfContact m_nsHeadImgUrl] forKey:@"headImg"]; [args addObject:nativeUrl forKey:@"nativeUrl"]; [args addObject:msgWrap.m_nsFromUsr forKey:@"sessionUserName"]; [[[%c(MMServiceCenter) defaultCenter] getService:[%c(WCRedEnvelopesLogicMgr) class]] OpenRedEnvelopesRequest:args]; } } } %end |
运行,发送红包,秒抢成功!
6.迁移到非越狱机器:
刚刚只是在进行越狱平台的开发,如果想把代码迁移到非越狱平台运行就继续往下看。
这篇文章也提到过这种方式http://www.alonemonkey.com/inject-with-njb.html。
编写dylib,注入load command,重新名,运行。
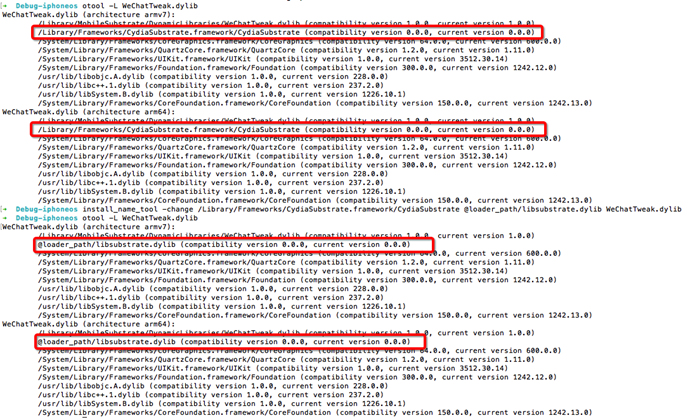
这里想直接只用越狱环境编译的dylib,但是该动态库依赖于libsubstrate.dylib。
➜ otool -L WeChatTweak.dylib
WeChatTweak.dylib (architecture armv7):
/Library/MobileSubstrate/DynamicLibraries/WeChatTweak.dylib (compatibility version 1.0.0, current version 1.0.0)
/Library/Frameworks/CydiaSubstrate.framework/CydiaSubstrate (compatibility version 0.0.0, current version 0.0.0)
原来依赖的是CydiaSubstrate,这里修改为libsubstrate.dylib。
使用insert_dylib工具把自己的动态库注入到微信可执行文件。
./insert_dylib @executable_path/WechatTweak.dylib WeChat
动态库重签名:
codesign -f -s “iPhone Developer******” ***.dylib 对动态库进行签名
然后拷贝两个动态库到可执行文件的目录下,再拷贝embedded.mobileprovision到可执行文件目录。
修改Info.plist文件的Bundle id。
编写Entitlements.plist文件:
<?xml version=”1.0″ encoding=”UTF-8″?>
<!DOCTYPE plist PUBLIC “-//Apple//DTD PLIST 1.0//EN” “http://www.apple.com/DTDs/PropertyList-1.0.dtd”>
<plist version=”1.0″>
<dict>
<key>com.apple.developer.team-identifier</key>
<string>>**********.</string>
<key>application-identifier</key>
<string>**********.com.codesign.demo</string>
<key>get-task-allow</key>
<true/>
</dict>
</plist>
对已经签过名的可执行文件调用ldid -e 即可获取这些信息。
重签名:
codesign -f -s “iPhone Developer:******” –entitlements Entitlements.plist ./WeChat.app
至于微信其它的一些extension,重签名也可以,否则直接把Watch和Plugins目录删除。
打包:
xcrun -sdk iphoneos PackageApplication -v WeChat.app -o ~/WeChat.ipa
最后使用iTools安装即可。
7.调试小技巧:
新建一个ios 应用的Target,就叫WeChat。
在工程的Build Phases加入自己的脚本,完成以上的重签名操作,然后把重签名生成的WeChat.app覆盖调用上面target生成的app。
这样就是可以在自己编写的动态库里面下好断点,然后点击运行,Xcode便会自动执行脚本,完成重签名的操作,然后安装重签名后的微信,进入调试模式。
然后就可以愉快的在微信里面调试自己的动态库了~~~~
本文链接:http://www.alonemonkey.com/wechat-openredenvelopes.html




Permalink
请教下,微信的extension这些需要砸壳吗?直接重签名就行了吗?
Permalink
楼主,为何我按你说的,重新签名微信,用itool安装时提示校验程序信息出错,安装不了。步骤
1、将WeChat.app下的Watch和Plugins目录删除。
2、拷贝hook.dylib(依赖改为libsubstrate.dylib)和libsubstrate.dylib、embedded.mobileprovision到WeChat.app
3、重签hook.dylib,WeChat.app
4、打包
Permalink
看设备Log,libsubstrate.dylib也要重签名
Permalink
ios的微信透视是啥原理,一直没人解密。求大神解密。
Permalink
文章写的太好了,对我搞越狱和非越狱都有非常大的帮助!赞一个,顺便问下,老大换友链吗?还请别嫌弃我是一个菜鸟。
Permalink
感觉很复杂
Permalink
楼主,我用logify生成的tweak替换了tweak之后,编译报
Tweak.xm:23:175: error: unknown type name ‘BadRoomLogicController’
Tweak.xm:23:375: error: unknown type name ‘BadRoomLogicController’
Tweak.xm:23:409: error: unknown type name ‘BadRoomLogicController’
Tweak.xm:23:600: error: unknown type name ‘BadRoomLogicController’
Tweak.xm:23:3696: error: unknown type name ‘WXGesture’
Tweak.xm:23:3866: error: unknown type name ‘WXGesture’
Tweak.xm:23:3887: error: unknown type name ‘WXGesture’
Tweak.xm:23:4048: error: unknown type name ‘WXGesture’
Tweak.xm:23:4364: error: unknown type name ‘MMTimer’; did you mean ‘NSTimer’?
请问该怎么解决这个问题?
Permalink
我也是这个错误请问你解决了么
Permalink
大神,最近我在研究微信转发消息,在AsyncOnAddMsg消息里面接受消息,然后处理转发对象,在调用AddMsg:MsgWrap:方法,就可以转发成功文字消息,但是图片的话一直不成功,是不是有什么关键性参数没有设置,大神,能否点拨我一下